As the leaves turn to hues of gold and the air gets a bit chillier, it can only mean one thing – Halloween is just around the corner! This year, why not gather the family for a delightful culinary adventure? From creepy crawly cupcakes to ghostly goodies, we’ve rounded up some spooktacular Halloween treats that are not only delicious but also perfect for creating lasting memories with your loved ones.
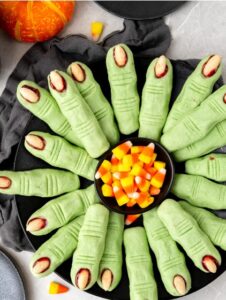
“Wickedly Good Witches’ Fingers” 🧙♀️
These eerie yet scrumptious witches’ fingers are a hauntingly delightful way to kick off your Halloween treat-making adventure. Here is a recipe that littlesunnykitchen.com put together for these witchy treats!
📝 Recipe and Instructions:
2 1/4 cups ALL PURPOSE FLOUR
1 teaspoon BAKING POWDER
1/4 teaspoon SALT
3/4 cup UNSALTED BUTTER (room temperature)
3/4 cup POWDERED SUGAR
1 LARGE EGG (room temperature)
1 teaspoon VANILLA EXTRACT
GREEN FOOD COLORING (optional)
20 BLANCHED ALMONDS
2-3 tablespoons SEEDLESS RASPBERRY JAM
Preheat the oven to 350F° (180°C), or 160°C if you have a fan oven. Line two baking sheets with parchment paper or silicone baking mats and set aside.
In a small bowl, whisk together the flour, baking powder and salt; set aside.
In a separate bowl, cream the butter and powdered sugar until smooth.
Add the egg and vanilla extract and beat again. Add desired amount of green food coloring and mix well.
Mix the dry ingredients into the butter mixture in 2-3 smaller additions, stirring well after each addition.
Portion the dough into 20 dough balls using a small (1.5 tablespoon) cookie scoop. Roll each dough ball between your hands to create a long skinny finger shape, then place on the prepared baking sheets 2” apart.
Press an almond into the end of each cookie, with the pointy side of the almond facing away from the cookie. Use a butter knife to create lines to resemble knuckles, then pinch the dough around the almond and in between the lines to make it finger shaped.
Bake in the preheated oven for 8-10 minutes, or until the cookies are puffed and lightly golden on the bottom.
Heat the jam in the microwave for 10-15 seconds and stir to make it easier for dipping.
Allow the cookies to cool 2 minutes before carefully removing the almonds from the cookies and dipping them in the jam, then press them back into the same spot on the cookies.
Transfer the cookies to a cooling rack to cool completely.

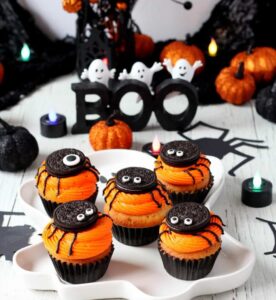
“Creepy Crawly Spider Cupcakes” 🕷️
Let’s spin a web of deliciousness with these eight-legged cupcakes! They’re perfect for little ghouls and goblins. Here is a recipe that we found on juliarecipes.com to create these spooky masterpieces!
📝 Recipe and Instructions:
VANILLA CUPCAKES:
1 1/2 cup ALL PURPOSE FLOUR
1 1/4 teaspoon BAKING POWDER
1/3 teaspoon SALT
1/2 cup UNSALTED BUTTER (softened)
1 cup SUGAR (granulated)
3 LARGE EGGS (room temperature)
1 teaspoon VANILLA EXTRACT
1/2 cup HEAVY CREAM
WHITE CHOCOLATE BUTTERCREAM:
2 bars WHITE CHOCOLATE (chopped)
3/4 cup and 2 tablespoons BUTTER (unsalted)
2 cups SUGAR (powdered)
1/2 teaspoon VANILLA EXTRACT
1 teaspoon ORANGE GEL FOOD COLORING
5 drops BLACK GEL FOOD COLORING
DECORATION:
12 pieces OREO COOKIES
24 pieces CANDY EYES
For vanilla cupcakes:
- Preheat the oven to 350°F (177°C) & line Mosaic muffin pan with cupcake liners to prepare for baking.
- In a medium-sized bowl, sift together the all-purpose flour, baking powder, and salt. Set aside.
- In a separate large mixing bowl, using an electric mixer or a balloon whisk, cream together the softened unsalted butter and granulated sugar, until the mixture becomes light and fluffy. This typically takes about 2–3 minutes.
- Add the room temperature eggs one at a time, mixing well after each addition. Then, stir in the vanilla extract. Scrape down the sides of the bowl to make sure all ingredients are fully combined.
- With the mixer on low speed or a balloon whisk, gradually add the sifted dry ingredients to the wet mixture in two parts, alternating with the heavy cream. Mix until just combined; be careful not to over mix, as this can lead to dense cupcakes.
- Using a scoop or spoon, evenly distribute the cupcake batter into the prepared cupcake liners, filling each about two-thirds full. This will allow room for the cupcakes to rise as they bake.
- Place the muffin pan in the preheated oven and bake for approximately 18–20 minutes, or until a toothpick inserted into the centre of a cupcake comes out clean or with a few moist crumbs.
- Remove the cupcakes from the oven and let them cool in the muffin tin for a few minutes before transferring them to a wire rack to cool completely.
For white chocolate buttercream:
- Place the chopped white chocolate in a microwave-safe bowl. Microwave it in 20-30 second increments, stirring well between each interval, until the chocolate is completely melted and smooth. Be careful not to overheat and burn the chocolate.
- Allow the melted white chocolate to cool to room temperature. It should be smooth and free of lumps, but not warm to the touch.
- Cream the butter for 2–3 minutes until smooth and fluffy. Gradually add the powdered sugar to the creamed butter. Start the mixer on low speed to avoid sugar clouds, then increase the speed to medium or use a balloon whisk. Continue to mix until the sugar is fully incorporated, and the mixture is light and fluffy. Add vanilla extract and mix it in.
- With the mixer on low speed or with a balloon whisk, pour in the cooled melted white chocolate. Mix until the chocolate is fully combined with the butter and sugar, and the frosting becomes smooth and creamy.
- Reserve two tablespoons of buttercream in a small bowl, add a few drops of black gel food colouring and mix until all buttercream is well combined with black food colouring. Add more drops of black food colouring if needed.
- Take the rest of the buttercream and add a few drops of orange gel food colouring. Mix well until the food colouring is well combined. Add more orange gel food colouring if needed.
To assemble and decorate:
- Prepare a piping bag with a large open star tip (Wilton 8B) and fill it with orange coloured buttercream, secure the bag. Prepare the same way the black coloured buttercream, but with a small round tip (Wilton no. 2), secure the bag and set it aside.
- Place the Oreo cookies and eye candies on a small plates. Set aside.
- Take the cooled vanilla cupcakes and start piping, with a round motion, the orange coloured buttercream. Two layers of buttercream are needed to fill well the surface of the cupcake.
- With the black buttercream, pipe the spider’s legs on the side of the orange buttercream. Place the Oreo cookie right in the middle of the orange buttercream.
- Take more of the black buttercream and pipe two small dots of buttercream on the Oreo cookie to glue the eye candies.

Crafting Halloween treats with your family is a wonderful way to create cherished memories and embrace the spirit of the season. After all the fun is had and the treats are enjoyed, you might find your home in need of a little extra TLC. That’s where T.L.C. Home Services comes in. Our expert team is ready to handle any post-Halloween clean-up so you can focus on relishing the memories you’ve made. Call T.L.C. Home Services today and let us take care of the clean-up while you savor the sweet moments of this spooktacular holiday! 🎃👻🧙♀️


Leave a Reply
You must be logged in to post a comment.